OVERVIEW
Caravaneer 2 is a mixture of a turn based RPG and an open world trading game. It takes place in a post apocalyptic desert about 100 years after the collapse of our civilization. The game is generally realistic, so don't expect to find any laser guns or zombies in it. There's a demon baby who lives in the same bunker with the main character, but... oh well... no spoilers!
The game starts in the desert, but you almost immediately arrive at your bunker where the story begins. You have an option to change your direction quickly and go elsewhere. In fact, you can completely ignore the entire story and just do trading and fighting, but it might be a challenging option, especially in the beginning because you will not get any free stuff or directions to new places.
If you choose to follow the story you'll be given a weapon and a small sum of money and sent to a mission to find your missing companion. Make sure that you explore your bunker well before leaving it. You can find additional equipment as well as receive supplies and services that will come in handy when you'll be traveling in the desert.
Once you leave your bunker you're supposed to begin your mission, but you must not forget that no matter what you do, surviving in the desert and above all making progress with your mission requires resources. You must always have enough food and water for yourself and later also for your companions to make sure that you don't die from starvation or dehydration. You can hunt some food in the desert and collect some forage for your animals if you have them. You can also take resources from other people if you fight them, but most of the time you'll need to buy your resources in settlements or exchange them for other things. So, how do you get rich enough to buy these resources and other useful stuff like battle gear or transport? The most straightforward option is to trade. You need to buy goods where they are cheaper and sell them where they're more expensive. It may be difficult to find good trading routes, but you can get some advice from the desert dwellers in the beginning, so be attentive and explore different dialogue options. Also, make sure that you have some money reserve when moving to a new region. Not only will you need time to explore the new territory properly before starting to earn money, but you may also need new battle gear because bandits in the new region will most likely be stronger than before.
Bandits and other enemies will attack you as soon as they see you, unless your squad is considerably stronger that theirs. They can't really tell how skillful you are before they start fighting you, so they judge by the number of people in your squad and the gear they have. They may even run away from you if you are too strong for them.
Most bandits will remain hostile to you, no matter what you do, but other groups may be friends or foes depending on the situation. There are various factions in the game and you can develop different relationships with each one of them. Generally, when you improve your relationship with one of the factions you also improve it slightly with their allies. Your reputation with that faction's enemies will slightly worsen. The same works the other way around. If you attack a group, for example, its allies will get angry at you and its enemies will like you a bit more.
Apart from relationships with factions you also have specific reputations, such as Virtuous, Trustworthy or Lawbreaker. These reputations affect your possible dialogue options and are also affected by the dialogue options you choose. However, some of them can change in your everyday life as well. Defeating groups that are tougher than you gives you Tough reputation. Attacking a friendly group gives you negative Trustworthy reputation. Owning slaves gives you Slaver reputation. Freeing other group's slaves and accompanying them to a settlement gives you Virtuous reputation and reduces your Slaver reputation. Another way to reduce Slaver reputation is to buy slaves at slave markets and free them immediately (in game time). If it's not done immediately it will increase your slaver reputation instead. If a town finds out that you smuggled illegal goods into it, you will get lawbreaker reputation. If you bring bandits to police stations, your lawbreaker reputation is reduced.
There are many other aspects of this game that need to be explained. We'll try to cover most of them in other chapters of these instructions.
INTERFACE
There are several different interface states:
- Travel Mode
- Battle Mode
- Town Mode
- Navigation Screen
- Caravan Menu
- Trading Screen
- Healing and Repairing
- Schools
- Police Stations
- Filters
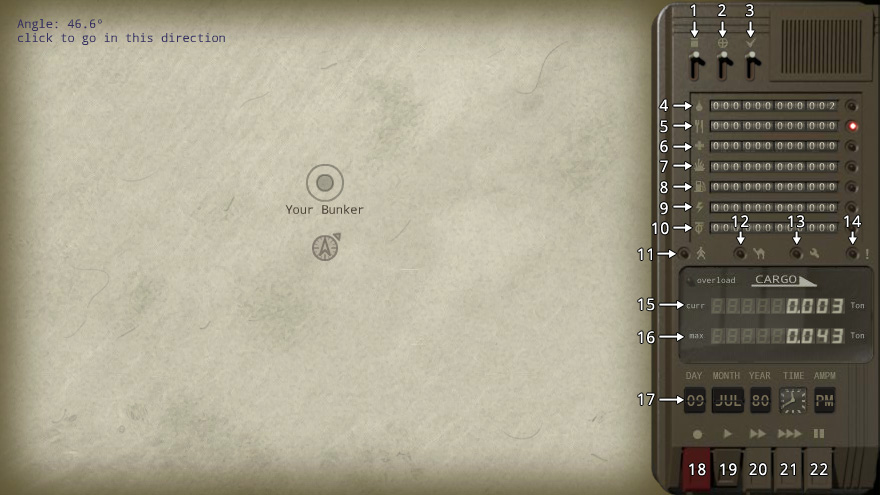
- Caravan Menu (hot key C)
- Navigation Screen (hot key N)
- Settings (hot key S)
- Water*
- Food*
- Medicine*
- Forage*
- Fuel*
- Electricity*
- Money
- Lights up if some people in your caravan are critically wounded
- Same as 11, but for animals
- Same as 11 and 12, but for mechanical transport
- Light up if there are some other problems, such as not enough animals to drag carts, for example
- The weight of your current cargo
- The maximum weight your caravan can carry
- Date and time
- Options: Save, load and exit game (hot key Esc)
- Normal game speed (hot key 1)
- Faster game speed (hot key 2)
- Maximum game speed (hot key 3)
- Pause (hot key 0 or 4)
Hot key M stops your caravan and resumes motion. Spacebar pauses and unpauses the game.
Battles use the same principle as in most other turn based games. Characters act one after another. When it's your character's turn you can make him/her move to one of the squares by clicking on the ground or perform an attack by clicking on an enemy. Holding Shift enables walk-only mode during which you cannot click on enemies to attack them. Holding Ctrl enables attack-only mode during which you cannot walk. The latter is useful to prevent misclicks.

- Current character's portrait. Click on it to center the view on the current character (hot key M or Spacebar)
- Health Points
- Morale
- Warnings. From left to right: Bleeding, on fire, overloaded, eye damage, arm damage, leg damage, critical health.
- Action Points
- Current weapon
- Currently loaded ammo - type and amount
- Swap weapon - switch to the weapon in the other slot (hot key F)
- Unload weapon (hot key U)
- Drop weapon (hot key I)
- Attack mode (can be changed with hot keys G and H)
- The type of ammo to use for reloading (hot keys T and Y to scroll)
- Reload button (hot key R)
- Minimap. Click on any point on the minimap to move the camera there
- Options menu
- First aid kit area. First aid kits serve to stop bleeding. Press Use (hot key C) and then click on the character to heal. Your people can heal themselves and those who stand next to them. If your character has different types of first aid kits, they can be scrolled (hot keys V and B).
- Pick up weapon area. If there's a dropped weapon in the same square as the current character, he/she can pick it up (hot key J). If there are several ones, you can scroll them (hot keys K and L). Note that to pick up a weapon your current weapon slot must be empty. If both of your weapon slots are occupied, drop one of the weapons.
- End Turn (hot key N, Enter and Tab)
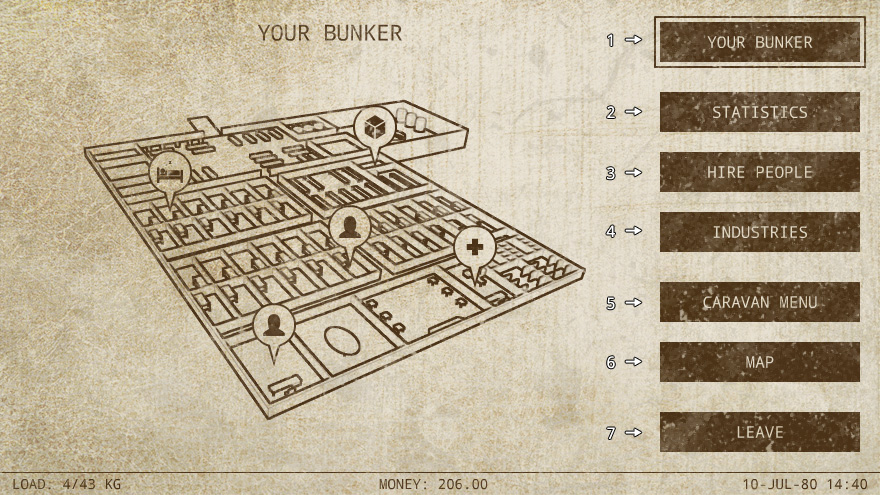
- The main screen where you see the map with locations. Click on the locations to enter them.
- Some statistics about the town, such how much of each product it produces and consumes. This information helps you get an idea about which goods are worth buying here and which ones could be imported.
- The section where you can hire mercenaries if any of them are available at this location.
- A list of the town's industries and the industries owned by the player. You can also access your storage and start new industries in this category.
- Open Caravan Menu
- Open Navigation Screen
- Return to the travel mode
Navigation Screen helps you calculate the direction you need to follow to get from one point to another. Simply click once on the map to set the origin and the second time to set the destination. Once you do it you will see the direction and also the distance between the points and an approximate amount of resources needed to complete the route. Note that when the algorithm calculates the amount of water you need, it doesn't take into the account the water contained in the food your people eat. The final amount of the water you'll consume will be lower.
Remember that there's no magic in Caravaneer universe and your map doesn't show your current position if you don't have a device that can measure your coordinates. If you are in a town or can see a town nearby, find this town on the map to know where you are. If you are lost in the desert, you are lost... Better luck next time.
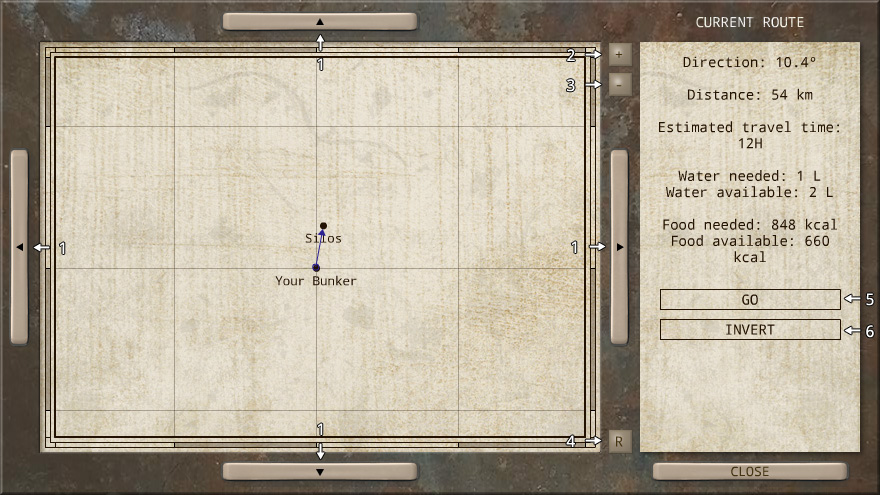
- Buttons that move the screen. You can also do it with the arrow keys or A,S,D,W
- Zoom in
- Zoom out
- Reset. This button adjusts the position and the zoom to let all your discovered locations fit on the screen.
- Go button only appears after you define a route. Pressing it automatically sets your caravan's direction to the one required by the route and sends you to the travel mode. (hot key R)
- Invert button reverses the route's direction.
The Overview section of Caravan Menu gives you some general information about your caravan and provides a list that tells you how much resources your caravan consumes and produces per day and how much you currently have. Note that water has X+Y format for availability and production. X stands for actual water and Y for the water contained in food.
The bottom part of the screen has a number of buttons that activate different tools. See picture item descriptions for specific information on each one of them.
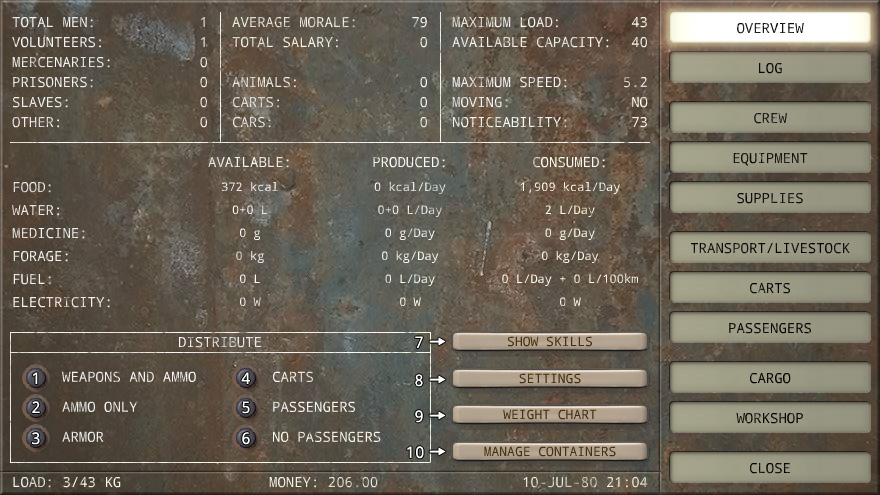
- Automatically distributes weapons and ammo among your people
- Lets your people keep the same weapons they currently carry and only distributes ammo
- Automatic armor distribution
- Automatically attaches carts to animals
- Places people and optionally smaller transport into bigger transport with an intention to increase your caravan's speed
- Removes all passengers
- A list of collective skills of your caravan. See Attributes and Skills chapter for more information
- Settings window
- A chart that shows how your cargo weight is distributed between different categories of items
- See Manage Containers for more information
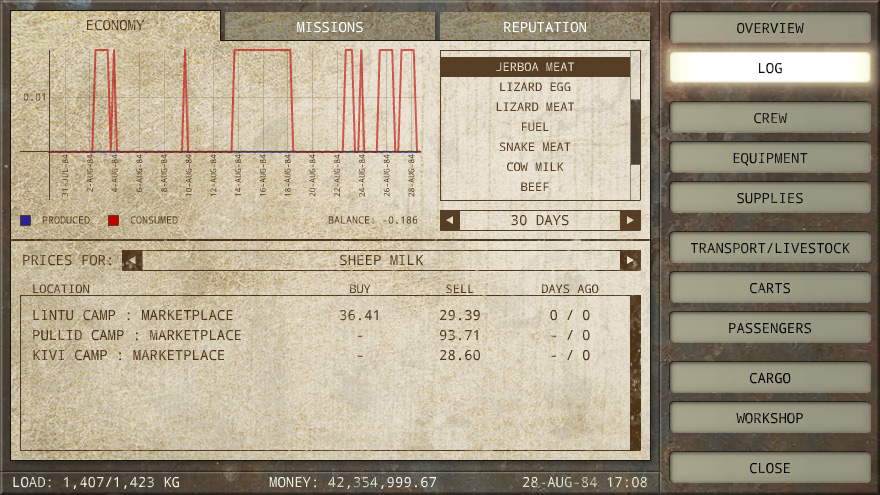
The log screen has Economy, Missions and Reputation categories. In the Economy part you can see a production/consumption graph. It shows you how much of each product was consumed and produced by your caravan. The bottom part of the Economy section has a list of prices. You can select a product and see how much it used to cost in different places. Note that it's a price for one unit and it's not how much the product costs right now but how much it used to cost the last time you checked. You can see how old this information is in the same line where the price appears. You can select different goods by scrolling them one by one, but if you have the product that interests you in your cargo, you can go to the Cargo section of Caravan menu, select the product and press See Price.
Missions section contains all your current, completed and failed missions and Reputation section shows your reputations and relationships with people and factions.
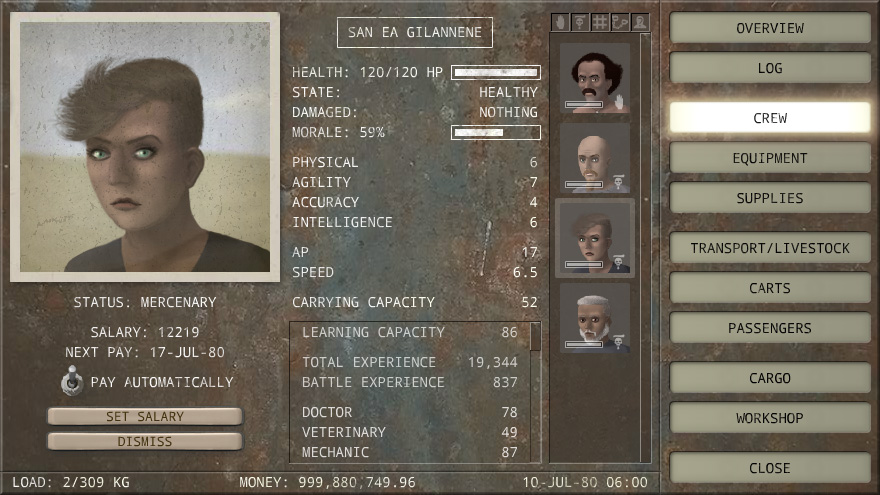
The Crew section has a list of the people you have in your caravan. When you select a person you can see detailed information about his/her condition, attributes and skills and perform crew related actions such as changing mercenary's salary or freeing a slave or a prisoner.
Equipment section is perhaps the most complex of all. It serves for assigning battle gear to your people. Only weapons, attachments, ammo, armor and first aid kits need to be assigned. Tools that affect collective skills are used automatically.
Assigning equipment is quite straightforward. You select a person in the left-hand list, a piece of equipment in the right-hand list and press Equip button if the equipment can be used. When equipping weapons or attachments, you may want to click on the specific slot you want it to go to. The rest of the equipment is assigned to an appropriate slot automatically. Double click on a weapon, attachment or armor to remove it. Items in the inventory are removed with a single click.
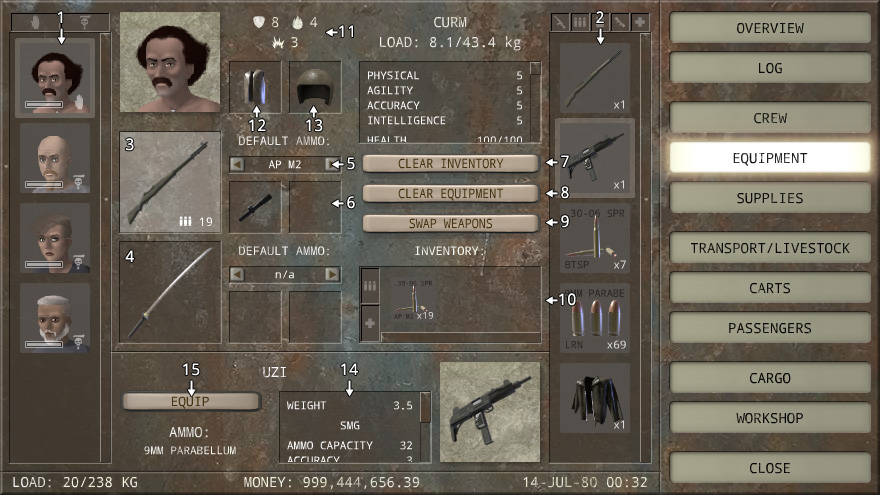
- List of people
- List of equipment
- Primary weapon slot
- Secondary weapon slot
- If a person has several types of the same caliber ammo in his/her inventory, here you can set the type of ammo that will be selected by default. It will also be automatically loaded into the weapon when the battle begins, so selecting the right type may help you avoid unnecessary reloading and save you some AP.
- Attachment slots
- Clear Inventory button removes the content of Inventory area, but leaves weapons, attachments and armor
- Clear Equipment removes weapons, attachments and armor, but keeps the inventory
- Swap Weapons button switches the content of the primary and the secondary weapon slots
- Inventory area contains all the items that don't need to be assigned to a specific slot like ammo and first aid kits
- Your total protection of your armor. The symbols stand for damage resistance, fire resistance and explosion resistance
- Body Armor
- Headgear
- Information about the selected equipment
- Equip button
Supplies section is not for playing the game at a basic level. For this reason it will not be explained here. There's a separate chapter dedicated to this subject:
Foodstuffs and Supplies
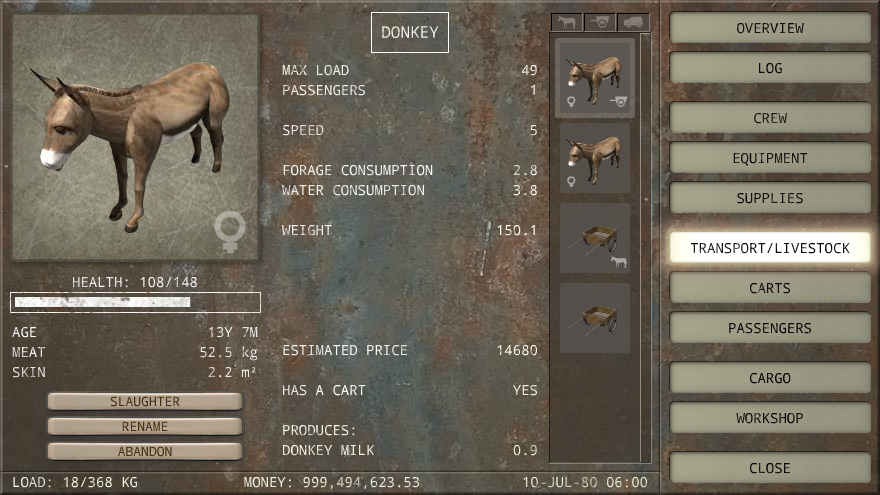
Transport/Livestock is similar to Crew section, but instead of people you have a list of transport and animals. Selecting one of them gives you complete information about it and allows you to perform actions such as abandoning it, slaughtering an animal or adding lubricant to a vehicle.
Symbols that appear next to an animal define the animal's gender and age. A baby bottle means that the animal is very young and drinks milk instead of forage and water. A cane means that the animal is very old and its attributes will be getting worse until it dies. There's a separate chapter where you can find more information about animals used as livestock:
Animals
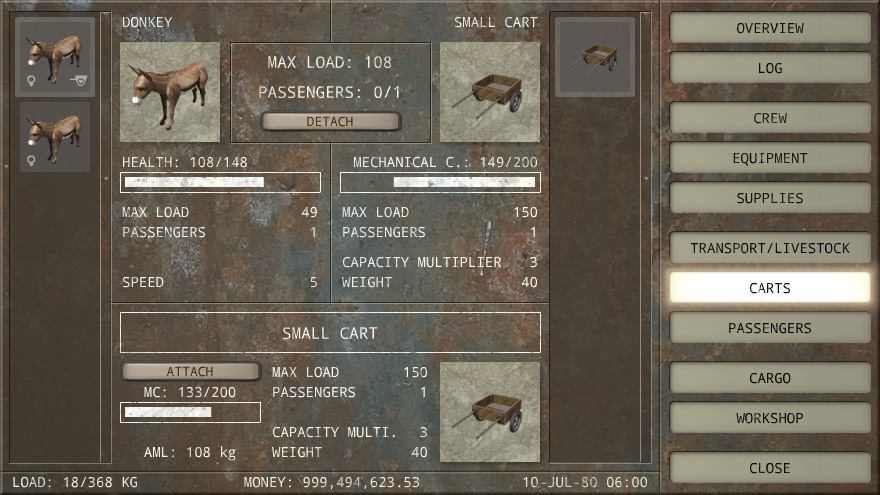
You can attach carts to animals. The interface is quite simple. Select an animal in the left-hand list, a cart in the right-hand list and click Attach button if attaching is possible. If the selected animal already has a cart, you can press Detach button between the animal and the cart pictures to detach the cart.
Selecting the right cart for each animal can be a little trickier than using the interface. You can find more information on this subject in the following chapter:
Carts
People no longer need to walk in Caravaneer 2. They can enjoy a comfortable ride in one of the transport units. It may also increase the speed of your caravan, but it always decreases capacity.
Note that motorized vehicle must have at least one person who will drive it. They will not be able to move otherwise.
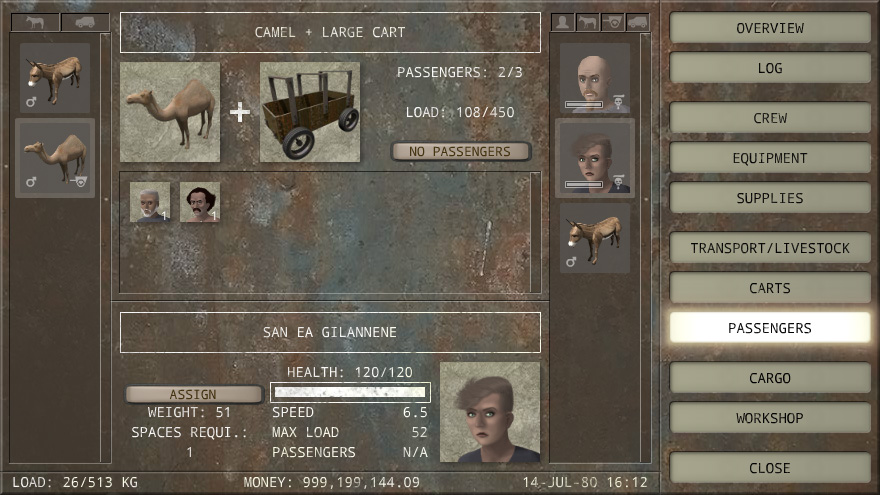
Passengers screen has a list of transport in the left-hand part and a list of potential passengers in the right-hand part. The middle section is divided into three parts: The upper part shows the selected transport, the middle part shows all the passenger the selected transport currently has and the bottom part displays the selected passengers. You can place the selected passenger into the selected transport by clicking Assign. If there's no space or the passenger is too heavy, Assign button will not be visible. Clicking on passenger pictures in the central section will remove them from the selected transport.
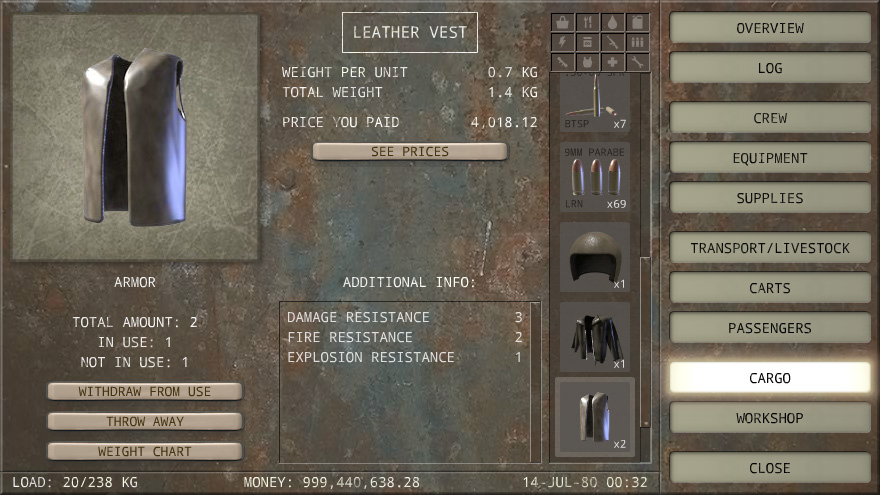
Cargo is similar to Crew and Transport screens. It has a single list that includes all items you have in your cargo. Selecting one of the items gives you information about it and allows you to perform different actions such as throwing away things, reading texts or withdrawing items from use. The latter will be discussed later in this chapter.
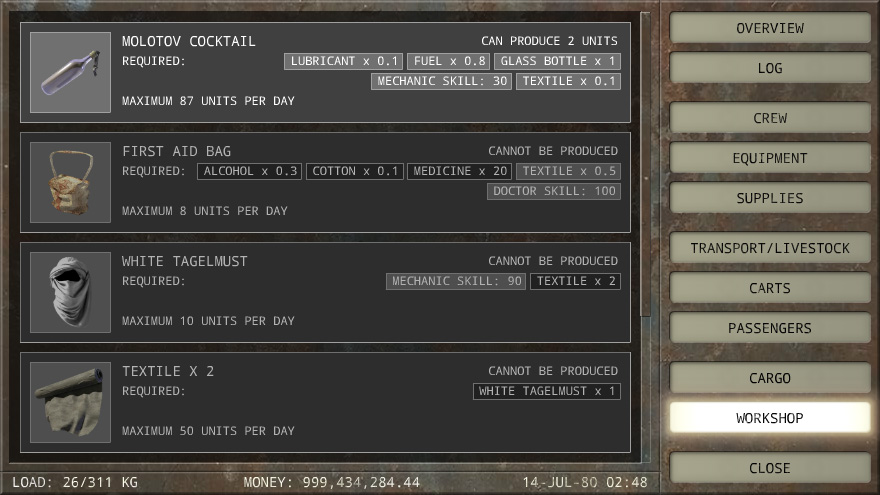
In workshop you can make new items out of other items. You must have all ingredients, all necessary tools and all required skills to produce an item. There's also a limit to how many items can be produced per day. This limit grows if the required skills increase.
In Caravaneer 2 liquids need containers to be stored. Same containers can be used for different liquids (not at the same time). Containers are distributed automatically when you add or remove liquids, but you can redistribute them differently if you like.
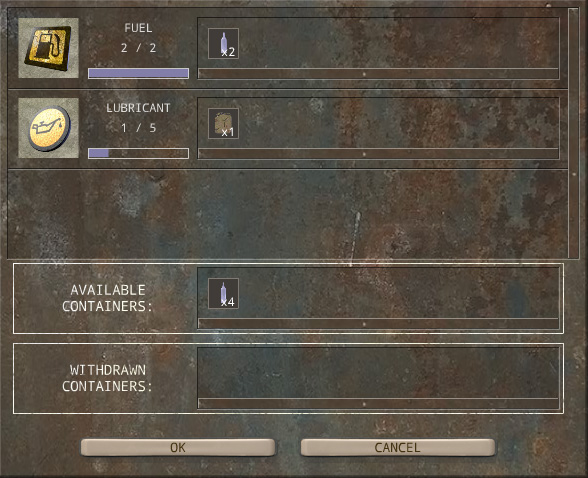
Manage Containers window has a list of the liquids you currently have in your cargo and the containers used to store these liquids. You can drag containers between the liquids to redistribute them. Make sure that all liquids have enough containers before you close this tool. If you press Cancel, all containers will be returned to the configuration they had before you started managing them.
The bottom part has available and withdrawn containers areas. You can drag containers to and from the available area as if it was another line in the list. Withdrawn area is different. When you drag a container there, all containers of the same type get withdrawn from use. The withdrawn containers will no longer be used during the automatic distribution.
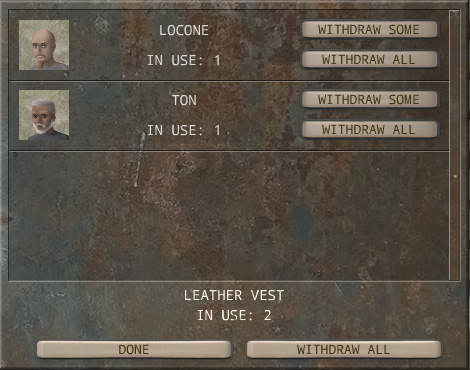
When one of your people has an item in his/her equipment, this item becomes in use. Items in use cannot be sold or thrown away. You need to remove these items from people's equipment before you can do it. One way to remove the items is to go to Equipment section, find the people who have them and remove them one by one, but Withdraw from Use tool makes this task a bit easier. It provides a list of all people who are using the item. If you want to remove some or all items from the person's equipment, you just need to press the corresponding button. Withdraw All button at the bottom of the window will remove the item in question from everybody who uses it.
Trading and exchanging items with people and locations is done through Trading Screen. It has a list of all your items in the left-hand part and a list of the partner's items in the right-hand part of the screen. The area in the middle represents the current deal. You can place your items onto the upper half of this area and the partner's items onto the lower part. The number that appears in the middle is the difference between the values of the two parts. This difference is paid with money unless the partner doesn't have enough money to cover the difference. In this case you may want to take more items from the partner's list to substitute money.
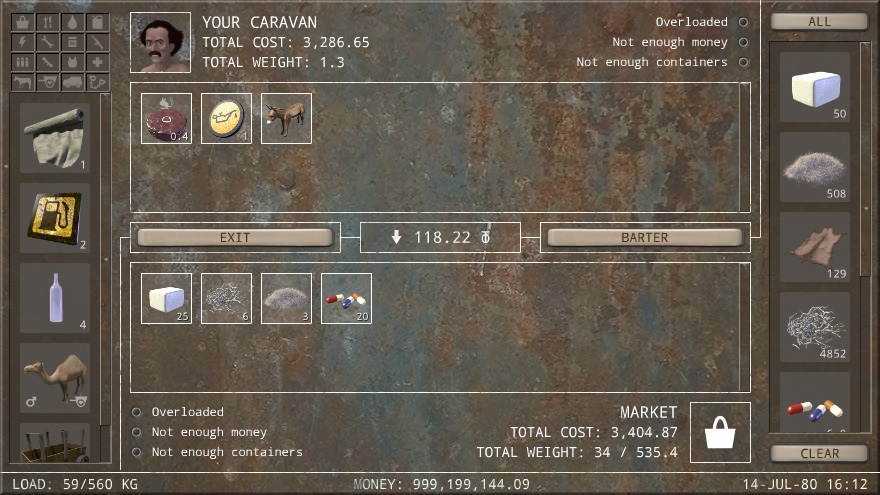
Press Barter to complete the deal or Exit to cancel it.
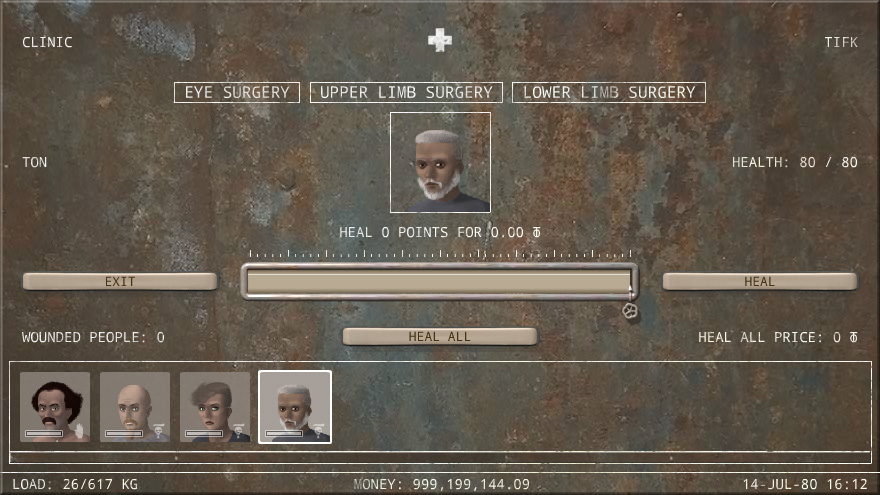
Healing and repairing is done through the same kind of interface. You select the person, the animal or the transport you want to heal or repair in the list at the bottom part of the screen and press Heal. You can drag a slider at the health bar to select how many health points you want to restore. It's set to full healing or to the maximum healing you can pay by default.
There's also a Heal All button that heals all people, animals or transport that can be healed in this facility.
Some clinics for people can also heal permanent injuries like eye damage, arm damage or leg damage. If the selected person has one of the injuries that can be healed in the current facility, the name of the injury at the upper part of the screen will become while. Click on it to heal the injury.
There are several schools in Caravaneer 2 where people can improve their skills in exchange for money. The people must be left in the school for some period of time and should be taken back later.
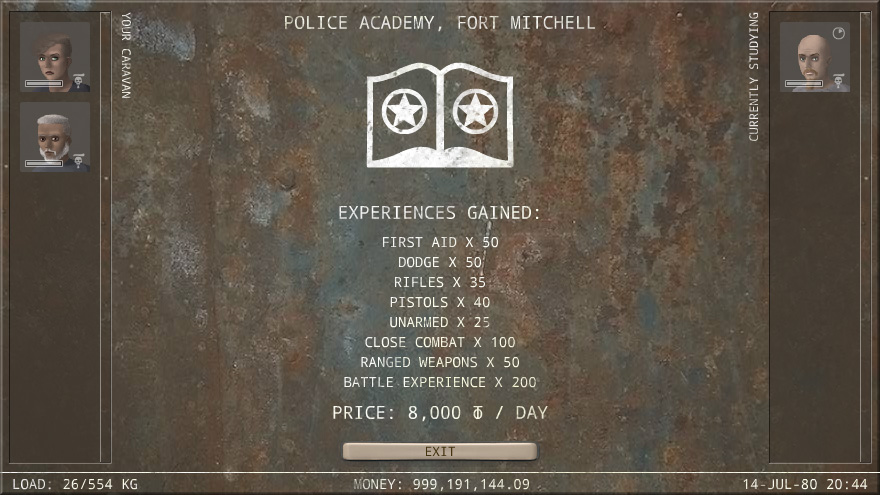
The list to the left contains all the people in your squad except for your main character who must always remain with the caravan. You can click on one of these people and then define the number of days you want him/her to study.
The list to the right contains the people who are currently studying in the school. A circle in the top-right corner of their portraits shows the progress. When it turns blue it means that the person has finished his/her studies and can be taken back. You can take your people back before they finish studying, but you'll not get any of the money you paid for their education back. To do so, just click on the person you want to take back in the right-hand list.
If during a battle all enemies panic, you have an option to imprison them. Imprisoned enemies can be then exchanged for rewards in a police station. Police stations don't pay rewards for everyone. You can only get rewards for those whom they consider criminals, namely those who belong to their enemy factions. In most cases, bandits caught in the same area where the police station is would give you a reward.
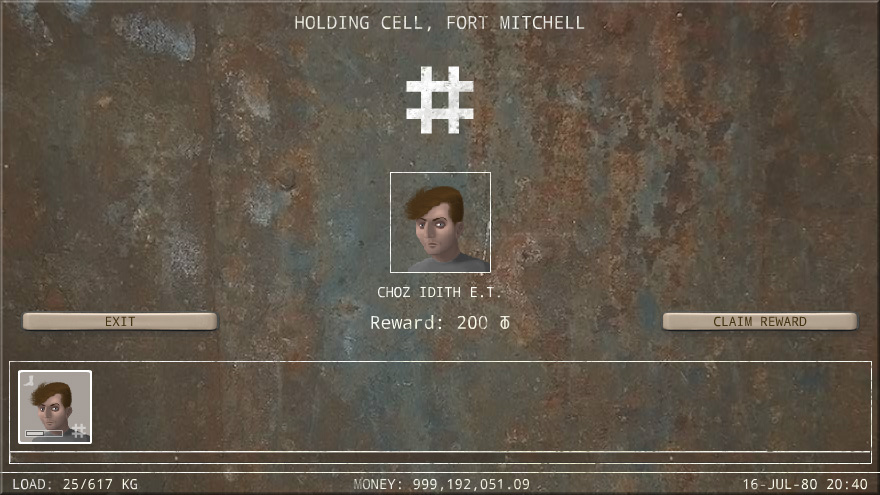
The interface for police stations is very simple. Just click on the prisoner you want the reward for in the list in the bottom part of the screen, see if they give you any reward and press Claim Reward if they do.
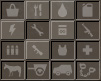
The little buttons you'll see next to some of the lists are filters. Each filter represents a category of items. All filters are enabled in the beginning. If you click on one of the filters it becomes disabled and all items that belong to the filter's category disappear from the list. For example, if you don't want to sell any food, you can disable food filter and your list become shorter and easier to work with. If you double-click one of the filters, it enables this filter and disables all others.
Filters on the example picture are in left to right, top to bottom order are: Market items, food, liquids, liquid containers, electrical devices, tools, miscellaneous items, weapons, ammo, attachments, armor, first aid kits, animals, carts, cars, slaves.
PEOPLE
There are several categories of people in Caravaneer 2:
Volunteers: Your main character and some other people who will join you as part of the story are volunteers, meaning that they don't get paid for working for you.
Mercenaries: The people you hire in towns are mercenaries. They need to be paid weekly. If you don't have enough money to pay them, they will leave your squad. You can also dismiss a mercenary whenever you want, but remember that if you are in the desert, you must accompany the dismissed mercenary to the nearest settlement.
Prisoners: If all enemies panic during a battle, you can either let them go, kill them anyway or keep them as your prisoners. Prisoners can be then converted into slaves or passed to the authorities for a reward. Prisoners don't participate in battles and don't carry any cargo.
Slaves: There are different ways to obtain slaves. You can buy them, enslave your prisoners or take the slaves your defeated enemies were transporting. Owning slaves gives you slaver reputation that may be harmful for the story. This reputation can be reduced by freeing slaves. Slaves can carry weight, but they don't participate in battles.
Temporary members: Temporary members are all those people who will automatically leave your caravan when certain conditions are met. These can be freed slaves or prisoners, dismissed mercenaries or somebody who temporarily accompanys you as part of the story. Temporary members may or may not participate in battles depending on the specific kind, but they are never controlled by you on the battlefield.
Most of the mercenaries you can hire in towns belong to factions. In most cases, their faction will be the same as that of the majority of the town's population (e.g. most of the mercenaries in Lintu Camp will belong to Lintu faction), but sometimes you may see mercenaries from other factions as well. The friendlier the mercenary's faction is, the lower his/her salary will be. Mercenaries that belong to hostile factions may not want to join your caravan at all.
Sometimes freed slaves and prisoners can be hired as mercenaries, but for this to happen, their morale must be high. You will learn how to raise people's morale in Morale chapter.
People may get arm, leg or eye damage in battles. These damages cannot be healed in field conditions. You need to take an injured person to a doctor or a clinic in one of the settlements. Not all clinics can treat all damages, so you need to find an appropriate one.
Arm damage makes the person consume twice as much AP for using weapons in battles.
Leg damage makes the person spend 2 AP per square when walking in battles and also reduces the person's speed in the travel mode.
Eye damage reduces the person's accuracy.
In Caravaneer 2 people can change their weight over time. It depends on the amount of food they receive. You can see their current weight and how it relates to the ideal weight in Crew section of Caravan Menu. Try to keep the field called % of Ideal as close to 100 as possible. If a person becomes overweight or too skinny, it will negatively affect his/her attributes. Besides, extreme emaciation can cause the person to constantly lose health.
ATTRIBUTES AND SKILLS
The four basic attributes for Caravaneer 2 characters are Physical, Agility, Accuracy and Intelligence. These attributes affect all skills and parameters of the character. You should see them as the traits the character was born with. They can be temporarily affected by the character's condition, but they can't be permanently changed. However, most of the things they affect do change with experience, so even if a person does not have a natural talent for something, he/she can still be good at it by investing a lot of time and effort into training and gaining experience. Now, if another person who does have the necessary talent gets the same amount of experience, this second person will still be better.
Caravaneer 2 has many specific skills. Most of these skills are affected by their specific experiences that are gained when these skilled are used, but there are also groups of skills that share the same experience that affects them all. Here's an example: When a person shoots a rifle he/she gains rifle experience that improves his/her rifle skill, but at the same time he/she gains ranged weapons experience that affects his/her rifle skill, pistol skill, crossbow skill and other skills that have to do with ranged weapons. Besides, this person also gets general battle experience that affects AP.
There are so called collective skills that work on the level of the caravan. Most of these skills use the same principle: The person whose personal skill is highest adds his/her skill value to the collective skill. The person with the second highest skill contributes 1/2 of his/her skill, the third 1/3 and so on. For example, if your caravan has four people whose doctor skills are 100, 90, 60 and 40, your caravan's collective doctor skill will be 100+90/2+60/3+40/4 = 175.
Sight and speed work differently. The sight of your entire caravan is the same as that of the person with the best sight. The speed is defined by the slowest person or animal.
Here's a full list of skills and parameters with their base value between brackets and the experiences they are affected by:
Learning capacity: (Intelligence*14.3) It may not sound as something very important in a post-apocalyptic world, but it's, in fact, one of the most important parameters. It defines how much experience a person gains when he/she does things and also when he/she studies in schools. Thus, in the long term, it affects all skills and parameters that depend on experience.
Carrying capacity: (Physical*8) Affected by travel experience. Lowers when the person is wounded.
Doctor: (Intelligence*10) Affected by doctor experience. Drops when the person is wounded.
Veterinary: (Intelligence*6) Affected by veterinary experience.
Mechanic: (Intelligence*3+Agility*2) Affected by mechanic experience.
Hunting: (Agility*3+Accuracy*4+Intelligence) Affected by hunting experience. Lets the person hunt more effectively in the travel mode.
Collecting: (20+Agility*5) Affected by collecting experience. Makes the person collect more forage in the travel mode.
Smuggling: (Agility*4+Accuracy*2+Intelligence*3) Affected by smuggling experience. Lets the person smuggle banned goods into towns more successfully.
Sight: Affected by accuracy and travel experience. Let's the person see objects in the travel mode from longer distances.
Speed: (3+Agility/2) Decreases when the person is wounded. This is the travel mode speed that does not affect battle performance in any way.
AP: (5+Agility*1.5) Affected by general battle experience. Lowers if the person is overloaded. Battle morale has a temporary effect on the number of AP. This effect will be explained in more detail in Morale chapter.
Ranged Weapons: (Accuracy*8) Affected by ranged weapons experience.
Close Combat: (Physical*1.8+Accuracy*0.7) Affected by close combat experience. This skill affects your chance of hitting a target with a melee weapon.
Unarmed: (Physical*1.5+Accuracy*0.4) Affected by unarmed experience.
Throwing: (Physical*7) Affected by throwing experience. Defines how far you can throw grenades.
Throwing accuracy: (accuracy*4) Affected by throwing experience. Defines how precisely your grenades are thrown.
Crossbows: (Ranged weapons skill*0.5) Affected by crossbow experience.
Pistols: (Ranged weapons skill*0.7) Affected by pistols experience.
Rifles: (Ranged weapons skill*0.6) Affected by rifles experience.
Machine guns: (Ranged weapons skill*0.5) Affected by machine guns experience.
SMG's: (Ranged weapons skill*0.5) Affected by SMG experience.
Shotguns: (Ranged weapons skill*0.5) Affected by shotguns experience.
Rocket launchers: (Ranged weapons skill*0.5) Affected by rocket launchers experience.
Flamethrowers: (Ranged weapons skill*0.2) Affected by flamethrowers experience.
Knives: (Physical*1.8+Accuracy*0.7) Affected by knives experience.
Clubs: (Physical*1.8+Accuracy*0.7) Affected by clubs experience.
Chopping melee: (Physical*1.8+Accuracy*0.7) Affected by chopping melee experience.
Swords: (Physical*1.8+Accuracy*0.7) Affected by swords experience.
Dodge: (Agility*2) Affected by close battle experience. This skill defines your chances to dodge a melee and unarmed attack.
First Aid: (Doctor skill*0.8) Affected by first aid experience. This skill defines how effectively you can use first aid kits during a battle.
Pain threshold: Affected by pain experience (gained each time a person gets hit in a battle). This parameter defines how pain affects the person's morale. It indicates the point at which the person's morale starts to drop.
MORALE
People in Caravneer 2 have morale. It affects their performance during battles. If a person's morale drops below 8, this person panics and no longer participates in battles. If it's below 20, the person's AP are reduced. On the other hand, if it's above 80, the person receives extra AP.
Morale you see in Caravan Menu and morale your person will have in a battle are not the same. The second is based on the first, but it's also affected by the opponent. If the opponent is stronger that your caravan, your people will get scared and their morale will lower. If the opponent is weaker, your people's battle morale will be higher than their travel mode morale. Morale also changes during the battle. If one of your people dies, others will lose some morale. If you kill one of your opponents their morale will lower and yours will raise. People also lose morale when they take serious damage, when they are bleeding and, especially, when they are put on fire by molotovs or flamethrowers.
There may be different tricks to maintain your people's battle morale high, like healing bleeding or trying to prevent any deaths on your side, but basically, things that happen during battles are hard to control. What you should do is to try to keep your people's morale high outside the battles.
How to keep morale high:
Two of the most important factors for maintaining high morale are food and water. If your people are hungry or thirsty, their morale lowers. Increasing people's rations above 100% gives them a morale boost, but you should not abuse this option becuase your people may get fat. There's another factor you should take into the account: The taste of the food. If you select a food item in the Cargo section of your Caravan Menu, you'll see a number that represents the food's taste. Foods with negative numbers lower morale, foods with positive ones increase it.
Another trick that only works on mercenaries is raising their salaries. The salary you pay when you hire a mercenary is the one you agreed on. It cannot be lowered, but it can be raised. The raise doesn't need to be permanent, you can lower the salary back to its initial value later.
Winning battles increase morale. The incrementation depends on how strong the defeated enemy was. Defeating groups that are much larger than yours gives you a bigger morale boost.
Severely wounded people lose morale too. It may be the least of their problem at the moment, but you should try to heal your people as fast as possible to keep morale high.
All people in your squad affect each other's morale a little, but, above all, people with higher intelligence transmit their morale to people with lower intelligence. It basically means that you should try to keep intelligent people happier, but there's also another detail: Your main character's morale is usually high. It rises quicker than others' and it's easier to keep it at high values. You are fighting for yourself. Is there a better motivation that this? Well. The case is that an intelligent main character transmits his/her high morale to others, while a main character with low intelligence is affected by other people's morale.
FOODSTUFFS AND SUPPLIES
Caravaneer 2 has a number of different foodstuffs. All of them can be eaten by your people, but each one has its own characteristics, such as taste that has been explained in the previous chapter or energy. It may be challenging to provide your people with enough energy, which makes foods with higher caloric value more valuable as a supply. It doesn't necessarily makes them cost more. Their market price depends on completely different factors.
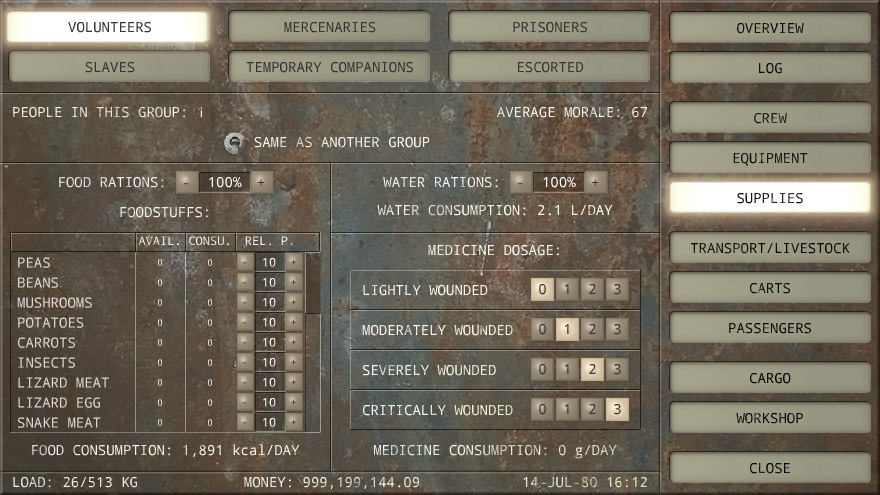
Supplies section of Caravan Menu lets you define how much of each foodstuff will be eaten by your people. There's a foodstuffs list in the bottom-left part with a number assigned to each foodstuff. This number stands for relative parts. It doesn't represent a specific amount of the foodstuff that will be eaten by your people, but only shows how much of the foodstuff will be used in relation to other foodstuffs.
For example, if you only have insects and jerboa meat in your cargo and you want your people to eat twice as much insects, you can set insects relative parts to 20 and jerboa meat relative parts to 10. It can also be 10 and 5 or 2 and 1 which would do the same trick if there are no other foodstuffs in your cargo.
Note that the relation between the foodstuffs is not defined by weight, but by energy. In the example above people will receive twice more calories from insect than from jerboa meat. The weight will be calculated accordingly. The two other columns in the foodstuffs list show how much of the foodstuff you currently have in your cargo and how much of it will be consumed per day with the current settings. These numbers are in units, not in calories. They are for you whole caravan, not only for the selected group of people.
You can set up different consumption schemes for different categories of people, but by default they are all set to be same as volunteers, so changing settings for volunteers you are changing settings for everybody else too.
Although relative parts are relative, a zero is always a zero. If you set a foodstuff amount to zero, your people will not consume any of it. Be careful with the zero because the indicator on the travel mode screen and all other places where your total food is calculated, include these blocked foodstuffs into the total amount.
Supplies screen also allows you to regulate food and water rations for your people as well as define how much medicine people will receive depending on the gravity of their injuries.
The amount of water people need to consume depends on their current body weight. If their body weight changes, their water consumption will change too even if the water rations size stays the same.
100% food ration has enough energy to maintain a person's body at its ideal weight. In the long term, people who receive 100% rations will lose weight if they have too much and will gain weight it they have too little. Incrementing or reducing food rations may be a good temporary solution, but it will cause weight problems if used for a long time.
ANIMALS
Animals in Caravaneer 2 can be used as transport, as livestock or, in some cases, both at the same time.
Most animals have carrying capacity and therefore increase the total carrying capacity of your caravan. You can improve their capacity by attaching carts and you can place people as passengers into these carts or directly onto animals' backs.
Some of the animals also produce goods. Females of all species produce milk and male sheep, goats and camels also produce milk. Besides, you can slaughter animals to get their meat.
You can breed animals in Caravaneer 2. It happens automatically. If you have at least one adult male that is not too old (doesn't have a cane sign in Caravan Menu), females of the same species will occasionally get pregnant. You can see what females are pregnant in the Transport / Livestock section of Caravan Menu. Once the gestation period is over, a female will give birth to one or several kids. These kids will drink milk during the first few months of their lives, but don't worry. Their mothers will produce more milk than normally during this period. If the kid's mother stays in your caravan, the kid will take her milk automatically and you won't need to worry about it, but if the mother is missing, the kid will drink milk from your cargo. Milk from the same species will be used in the first place. If you don't have enough of it, milk from other species will be used instead.
If animals don't receive enough food they will lose weight. Underweight animals lose capacity and in extreme cases their health decreases too. Feed your animals well to prevent these negative effects.
CARTS
Carts are attached to animals. All animals except sheep and goats can drag carts. Carts increase capacity and also have space for more passengers than the animal itself.
The capacity of an animal with a cart depends on the animal's natural capacity, the cart's capacity multiplication value, the maximum capacity of the cart and the cart weight.
The exact formula is: Animal's capacity * Capacity multiplication - Cart weight. This value is limited by the maximum capacity of the cart.
The rule of thumb for choosing right carts for your animals is to attach lighter carts to smaller animals and larger carts to bigger ones. However, animal and cart parameters vary, and to achieve the most optimal distribution, each case should be analyzed separately.
TOOLS
Some items in Caravaneer 2 can improve skills. These items are called tools. To understand how tools work, you first need to understand how personal skills of your people are combined to form a collective skill. It was explained in Attributes and Skills chapter, but I'll repeat it again here:
\"There are so called collective skills that work on the level of the caravan. Most of these skills use the same principle: The person whose personal skill is highest adds his/her skill value to the collective skill. The person with the second highest skill contributes 1/2 of his/her skill, the third 1/3 and so on. For example, if your caravan has four people whose doctor skills are 100, 90, 60 and 40, your caravan's collective doctor skill will be 100+90/2+60/3+40/4 = 175.
Sight and speed work differently. The sight of your entire caravan is the same as that of the person with the best sight. The speed is defined by the slowest person or animal.\"
Now imagine that the best specialist takes one unit of each tool and makes them improve his personal skill. If there are several units of the same tool, they go to the people whose skill is lower and improve their personal skill, but their personal skill affect the collective skill less, so these tools become less useful too. If a tool has more units than active members in your caravan (excluding prisoners, slaves and temporary members), the extra tools don't have any effect on the collective skill at all.
ELECTRICITY
Caravaneer 2 has a number of devices that use electricity. Electricity is different from other resources. It cannot be stored and used later. It's either there or it's not. Neither can you make your devices work at half power. If the total power required by your functioning devices exceeds the power produced by your generators, it creates overcurrent and all your devices stop working.
Many of the electric devices don't need to function all the time. You can turn them on and off in the Cargo section of Caravan Menu. Manage your devices wisely and save valuable resources.
BATTERIES
Batteries are not used to power your devices when your generators are off. They are not used in the travel mode at all. They only serve to power devices during battles. Right now, the only battery powered devices are weapon attachments. If you have any electronic attachments on your weapons, you must place enough charged batteries into the person's inventory. Otherwise the electronic attachments won't work.
The first attachment of the primary weapon has the highest priority. It will be powered by batteries first. Then, if there are enough batteries for the second attachment of the primary weapon, it will get them next. The first and second attachments of the secondary weapon will be powered last. If you want to change these priorities, you can switch the weapons or equip attachments in a different order.
Charged batteries only last for one battle. If a battery was in one of the attachments, it will become an uncharged battery at the end of the battle. You can charge batteries with a charger or just buy new charged batteries every time you need them.
INDUSTRIES
Most of the towns have industries. Industries take raw materials and convert them into new products. That's what makes the economy work.
Many towns allow you to buy some of their existing industries and start new ones. There's a list of possible new industries in Town Mode -> Industries -> New Industry
Once you own an industry, you must make sure that it has enough raw materials all the time to work properly. Otherwise you will lose money paying expenses and not earning anything back.
Industries already come with some storage space when you buy them, but you can also expand storage in Your Industries tab. This storage will be used both for raw materials and ready products. You can also place anything you want there and take it back whenever you want, but it's a different subject.
When an industry is at work, it will first check the storage for raw materials. You can buy these raw materials wherever you want and put them in the storage, so your industries will use them. However, if you don't do it or if an industry runs out of raw materials in the storage, it will try to buy them at the local market. That's why it's a good idea to leave some money reserve for your industries. Withdrawing and depositing money from reserves can also be done at Your Industries tab.
If an industry doesn't have enough raw materials and doesn't have money to buy them, it will try to sell some of the ready products if it already produced them. If it has no raw materials, no money and nothing to sell, it will stop working. The same will happen if the town does not have the necessary materials at the market. You should always make sure that there's a way for your industries to get their raw materials if you want them to earn you any money.
The ready products are put into the storage. You have an option to come to the town, take these products from the storage and sell them wherever you want, but if your industries run out of storage, they will be forced to sell these products at the local market for whatever price they'll be offered, so having enough storage space can also be very important.
If you see that your industries don't work the way they should, you can always downsize them to a smaller volume or even to zero and receive a small portion of the money back. In some cases, the town may be interested in buying your industry. If you sell it to the town, you will get much more money than from downsizing it.